The first step in this whole process was to rip out the old head, hoses, and fittings. I "accidentally" forgot to take pictures of the carnage but trust me, it was an OLD Groco head probably from 1969 when S/V Halcyon rolled out of the factory. It was definitely time for an upgrade. Once everything was out (less the old gate valve) it was time for a lot of scraping and sanding to get the old paint off and expose the glass. One good cleaning later with Acetone and tack cloth, the bathroom got a bright and shinny coat of Interlux Bilgekote white.


I failed to take pictures of my complete steps installing this toilet. This blog post is going to be a reflection on what went wrong and what I would have done differently next time. One of the issues I encountered was getting the hose to bend the way I wanted without putting pressure on connections and thru-hulls. Sanitation hose can be stiff and stubborn, especially in the larger diameter sizes required for plumbing toilets. Both bending it, and getting it to seat over barbed fittings can be a challenge. There are a couple methods that I used to bend it to my will; some with greater success than others. The first method I tried involved dipping the hose in hot water for a few seconds at a time. This worked for softening the hose but wound up getting it too hot; I buckled a section and had to cut it off the barbed fittings (twice.) I used a hair dryer for the remainder of the bends and that seemed to be just the right amount of heat to get the hose soft for bending and seating over barbed fittings, but not hot enough to kink.
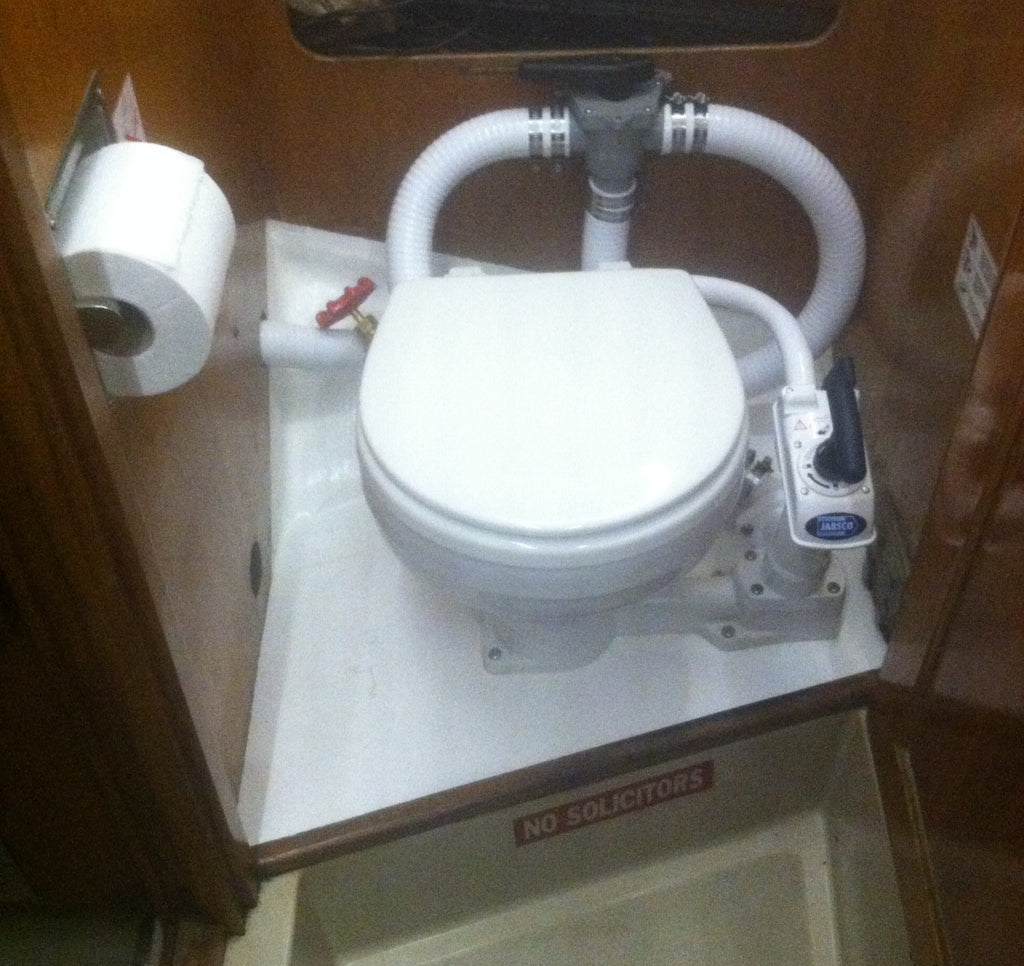
The toilet I decided to go with is a JAB 29090-3000 manual toilet with a compact bowl. I had installed this toilet in my old boat without a hitch; this installation was a different kind of beast. The only problem I has with the actual toilet was with the discharge port on the base of the pump. The first time I ran the hose I made too sharp of a bend from the nipple on the discharge to the Y-Valve. This torqued the discharge and the joker valve out of position enough to cause a leak. The second time I pivoted the nipple to a better angle and used the 2 coarse thread screws on the pump to torque the fitting on really well. I heated and worked the hose a bit more so it would conform to the bend. However, I used the same hose that the fittings had already stretched out and put it on backwards causing another leak. -The first seal you make with a new hose is the best one. So I bought a new chunk of hose and heated it with the same procedure, this time I used a drill to impact drive the hose clamps really tight around the warm hose. After it cooled it held perfectly with zero leakage. Phew!

The other main problem I had was with pumping out the contents of my holding tank. A lot of boats produced in the 60's didn't come with holding tanks; waste was simply pumped into the water. I have an "after the fact" 5 gallon holding tank that was installed under the closet just forward of the head. Great positioning close to the head, but mistakes can mean very stinky clothes. limited space also necessitated a 90 degree barbed fitting on the pump-out hose. This meant that upon trying to pump out it was completely clogged, zero flow. I poured some digester into the deck fitting and topped it off with some warm water. Two days later I tried to pump out again with no luck, but luckily I had a backup plan. An $8 toilet snake from Home Depot with the 90 degree plastic housing sawed off took care of the clog in no time! I will just have to stow that on board for future clogs. Gradual curves are always preferable to 90 degree bends when planning a route for your sanitation system, unfortunately this one was unavoidable in this tank location.
When I removed the old system I discovered that the gate valve on my discharge thru hull had fouled leaving about a 1/4 inch gap with the valve all the way closed. Water started coming in as soon as I gave the old barbed fitting a turn to loosen. I covered the valve with my hand and opened it all the way, then removed my hand and quickly plugged the hole with a pine plug. The thru-hull is plastic on my boat so I had to be extra careful not to crack it or disturb the sealant when removing the old valve. I had a friend thread the old valve off while I held the thru hull from the outside with a thru hull step wrench. Then plugged the thru hull from the outside and sealed the new gate valve on with Teflon tape. Bilge was completely full from that ordeal.


I couldn't find a whole lot of information about actual experiences using a vented loop with these toilets. The idea is that if any part of your toilet falls below the water line while the boat is heeled or at rest, you need a vented loop above the waterline to keep water from siphoning into the boat, the instructions for the toilet are a bit confusing. The toilet has a lockout feature that is designed as a secondary defense against this, however Jabsco makes it clear that the right way to do the installation includes a vented loop. I didn't have the space or the desire to include one in my system. For me, my thru hull valves and the toilet safety features are enough re-assurance that I am going to be able to stop any water coming in before it causes damage. My toilet rests just above the waterline, since completion I have gone sailing and thrown the toilet at least a few feet below the waterline with zero leakage. I will rest easy without my vented loop, but that doesn't mean you shouldn't give it some serious consideration before you tackle your system.
The next time I tamper with this toilet will be in a few years to replace the joker valve as preventative maintenance. Very happy this project is done for the moment. Hope this was helpful!