Kayak Bilge Pump Installation.
Adding a bilge pump to a kayak is certainly not a need, rather it is a carefully chosen addition that can add safety, convenience and a certain ‘wow’ factor that is hard to beat. Best of all it that this is an approachable project, one that is fairly easy both on the financial end and the practical end.
The reasons are as follows:
- When in big conditions, and you come out of your boat, being able to re enter a flooded boat and put your skirt on and just paddle is huge.
- When playing in any active water the time and effort it takes to empty a flooded boat is time that you aren’t able to paddle to a safer place.
- And honestly it just seems like a super cool modification :-)
The things to look for in a kayak bilge pump are:
- Reliability.
- Ease of use.
- A low draw-down height (the lowest level the pump will drain the water).
- Moderate to lower current draw.
- Enough water moved the make it worthwhile.
There have been a few systems commercially produced but always on a limited scale and at very high costs. And there are none remaining that I am aware of.
My entire project cost about: $180.00 including the cost of the battery, after tax and all the sundries. I have included costs for all the items we sell (all but the battery) at our prices.
For reasons of simplicity I decided wanted an ‘auto’ pump that would not require adding a switch. The most common installation is to use a manual pump and use a magnet actuated reed switch. While this When I made this decision it severely limited my options, and I nearly gave up until one of our technical representatives showed us the Rule “LoPro” series.

Hallelujah! This is a 900 gallon per hour, submersible, automatic pump with a solid state switch and a rotatable outlet to fit tight spaces (Rule LP900S: Not a float switch that would not do so well in the possible inverted situations us kayakers sometimes find ourselves in. While this switching does have a tiny power draw even when it is ‘off’ it is worth the simplicity of the system.
(Rule ‘LoPro LP900S’ $65.78 here at the store)
Step 1: Figure out where to mount the pump.
Because my Eddyline Raven has a track along the floor of the cockpit for the seat to slide along for adjustment, my options to mount it behind the seat were limited.
But with the low draw-down height on the LoPro it is possible to mount it at the front bulkhead and still get enough water evacuated to be practical. Because the sensor is in the red section of the pump I wanted to mount it longitudinally; running along the centerline.
Step 2: Figure out how to mount the pump and battery box.
As Eddyline kayaks are ABS type plastic I decided to use 3M “5200 Marine Adhesive Sealant”. Which is an extremely strong adhesive sealant, one that we often advise customers is ‘permanent’. Well, permanent is what I want for this install. ($9.71 for a 1oz. tube).
Mounting the pump to the floor was fairly straightforward. Be certain the pad eyes and the floor of the kayak are absolutely CLEAN!!! I used denatured alcohol for this as it evaporates almost instantly and leaves no residue.
Put a small amount of '5200' on a nylon pad eye (Sea-Dog ‘Eye Straps’: $2.15 for a pack of 5 here at Ship To Shore and stick it to the floor. I used small pieces of 3M masking tape to hold them in place.
The mounting location will be different for every kayak model. But the pump is flexible in its mounting locations so I believe it can work for most boats.

For the battery box I used a Pelican ‘1050 Micro Case’ box ($27.75). Because I mounted this to the forward bulkhead I used stainless machine screws and locking nuts with a little 3M ‘Marine Grade Silicone Sealant’ ($13.79 for a 3oz. package) to secure another nylon pad eye and seal it.
For all the attachment points I used small loops of shock cord (black or white in several sizes, sold by the foot) and then used 3M ‘Scotch Bundling Straps’ ($3.51 for a 6 pack).
I did a mock-up prior to any permanent gluing or fastening of course!
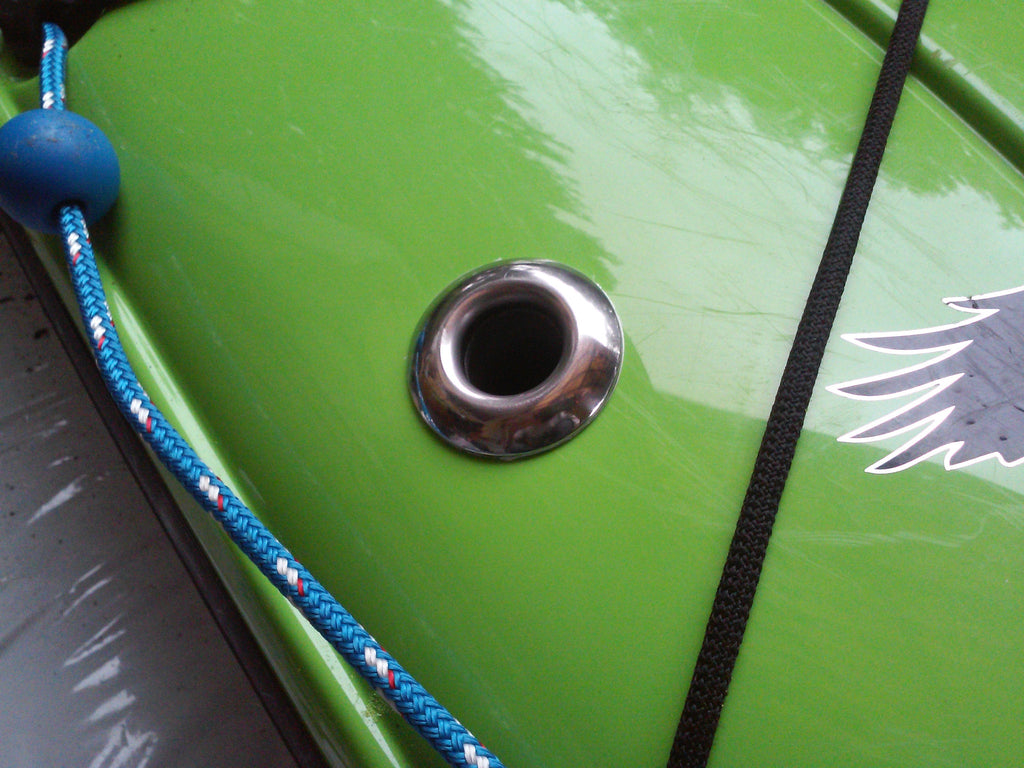
Step 3: Drill/cut some holes!!!
Okay, confession time. Because I did not have a drill bit large enough for the thru-hull, AND I was in a hurry I drilled a small hole, and then used a coping saw blade to cut the circle. Following this I used a file to smooth off the inevitable rough edges.
However, I would recommend using a forstner bit. Drill until the point comes through and then finish it off from the backside.
Use plenty of masking tape to prevent scratches. Mark your hole carefully, you don’t want to get this wrong . . .

After making sure it fit without any issues I masked the entire surrounding area and sealed it in place with plenty of ‘5200’. Clean any bits immediately as they will be permanent once they dry.

Masking tape is your friend here! Don’t skimp.
This is also a good time to drill a hole through the bulkhead for the wire gland. I used an Ancor ‘Wire Seal For Duplex & Triplex Cable’ ($11.96 for one). And I used a forstner bit on this one. So much easier!
I also drilled the battery box to accept another glad for the wire. I used another Ancor wire seal.

Use plenty of masking tape and again work the point of the bit through from one side and then carefully back from the other. The plastic can be brittle and you don’t want to shatter the lid of your box.

It is worth pointing out that you can simply drill a hole large enough for your wires and then permanently glue them in with ‘5200’ or less permanently with something else. I chose to use wire gland seals to I could remove the wires and pump without hassle at any time.
To make certain the glands were water-tight on an uncovered triple wire I squeezed a little silicone into the seal, and around the threads when I installed it through the bulkhead and the box.
Step 4: Put it all into place.
After installing give the ‘5200’ no less than 7 days to fully cure. If you don’t and you pull on those pad eyes you carefully glued in they will pull off and you will have to start again. I killed a week by going on vacation :-p
After vacation I got all the pieces together and spent a morning putting it all into place.
Using the Velcro to secure the pump into place was a little challenging as the space inside the footwell of a kayak is not the biggest space. It is much easier to secure the bilge hose to the pump before mounting it.
Putting the kayak on work stands, upside down worked pretty well when it's about waist high you can wriggle your torso all the way into the boat for the finer touch bits.
This I learned through trial and error.

Because the ‘LoPro’ pumps come with a tricuspid one-way valve you probably don’t need a loop to prevent backflow but I decided to be on the safe side and did it anyways. If this ends up being unnecessary I will remove the loop and plump it straight to the thru-hull.
Now is also the time to put the wires through the glands (sealing with a little silicone inside the gland) and tighten them down. It is also a good time to mount the battery box and put eh wires through. I added another velcro strap to hold the bilge hose in place to itself.
Step 5: Wire it up.

Because we are using an automatic pump the wiring is really simple, as is battery selection.
The sky really is the limit when it comes to batteries and you can go with anything so long as it is sealed, 12 volt and can be used in any orientation. I ended up using a cordless drill battery simply because I had one available, but I would suggest going this route.
These will be either NiCad or lithium batteries which have hugely more capacity than a sealed lead acid battery and they have convenient packaging and no hassle chargers.
I used a ‘Black & Decker’ 12 volt cordless drill battery model HPB12. This battery will cost you $36.99 from Ace Hardware or any other general hardware store. (any battery you use will need to be 12V to work) Black & Decker HPB12
You can use any battery type, and using a lithium battery will give you a lot more power and a lot less weight. I might go with a lithium battery in the future but this works well for now.
I used standard marine grade spade connectors that fit right on the battery contacts. And best of all it fits perfectly in the Pelican box.

When wiring you need to follow the instructions for ‘auto’ function. This means you will have one wire that is not used. Simply cover over the end (a butt terminal crimped on works great to protect the wire).
Step 6: Make sure it works.
After it was all wired it was time to give it a test run and . . .
It worked flawlessly!
So far I have emptied the entire cockpit full of water at least 10 times and the battery shows no signs of needing a charge. Realistically if it gives me 20 full cockpits emptied that would be enough, but I think I will get even more than that.
Also, it pumps enough water that the amount left in the boat is negligible.
All in all it was a satisfying and enjoyable project and a fun way to customize my boat.
A few notes after playing with it for a bit:
The outlet hose works best when it is coming vertically off the pump. In the horizontal orientation it seems to have trouble building up enough water for the impeller to function as well. With the hose outlet vertical it starts pumping sooner with less air.
Also, I ended up shortening the outlet hose to as short as it can be to make the bend. The large loop of hose and the check valve ended up restricting flow needlessly.
Hopefully this was interesting and informative. Shoot me an email with any questions and or comments and I would love to see any installs that you do.
Barry Walstead - Assistant Manager
Ship To Shore Marine
barry@shiptoshoremarine.com
253-858-6090
3315 Harborview Dr.
Gig Harbor WA
98332
Barry Walstead
I’ll try and post a video of the pump here soon.
Thanks for reading!